Replacing the 986 Boxster front engine mount
By Eddie Fort
aka Shade Tree Mechanic
Are you intimidated by the thought of working on your own Porsche? Well, you need not be. Doing basic maintenance on your Porsche as well as some more extensive repairs are just not that hard and once you get the courage to “jump into the deep end”. You’ll be surprised at just what you can accomplish with just a few basic tools and a little time.
In this installment I’m going to discuss the why and how to replace the Boxster’s front engine mount. If your Boxster is 5 or more years old and/or has 30,000 miles on it there’s a good chance that you may be noticing an engine vibration at between 2800 and 3000 RPM’s. I started noticing the vibration about 6 months ago and was worried it was something serious… I posted my symptoms on www.rennlist.com and within an hour 3 people came back with the same response “It’s your front engine mount”. In doing a little research I found that this is a common problem with mid engine Porsche’s that have a few miles on them. It seems that the heat generated by the mid engine design coupled with a soft rubber engine mount contributes to their relatively short lifespan.
Now that I felt relatively confident about what needed to be done the question arose did I want to replace it with an OEM component or an aftermarket one? Several years ago at one of the annual Boxster Summits held each year in Blowing Rock, NC I had the pleasure of meeting Pedro Bonnila. Pedro is an engineer by training and a “tinkerer” by nature. In the Boxster world he is know as the “King of the Hacks” for coming up with relatively inexpensive ways to improve various parts of the Boxster. He has turned his passion into a full time job and started his own company www.pedrosgarge.com. I gave him a call on the advice of a friend and sure enough he had two different versions, the Enthusiast and the Race versions. The main difference is that the race version is much harder due to the lack of holes in the rubber grommet and transmits more vibration into the cockpit than the enthusiast’s version which is still firmer than the OEM version. So, on his advice, I bought the enthusiast version since this is our street car. The total cost with shipping was only $174.00 and I will get an additional $50 back when the original core is returned for a net cost of only $124.00.
Before we get started I have to say I am not a mechanic and the procedures I talk about should only be considered as a guideline. You are solely responsible for your own actions.
First off we have to raise the car as we will be accessing the engine from below. This can be accomplished in one of three ways; you can raise your car on four jack stands, you can back your car up on a set of Rhino ramps or you can use a lift as we did. What ever you do make sure the car is secure and you are comfortable getting underneath it.
The first step is to remove the mid and rear lower body panels. This is accomplished with a 10mm socket (See Fig. 1).
The front engine mount is located just where you’d expect it to be .on the front of the engine (See Figure 2).
Start by removing the two plastic clamps that hold the coolant hoses to the engine support wishbone by moving them forward. (See Figure 3) This will allow you to wiggle the coolant hoses later on and drop the engine mount.
You will then want to place a jack under the front of the engine to support it before you remove the mount. We did this with a floor jack and a 2×6 piece of wood.
It is easier to remove the engine mount with its support wishbone. To do this start by loosening the two 15mm bolts on the top that hold the engine mount to the engine. There is no need to completely remove the driver’s side just loosen it. You will then remove the bolt on the passenger’s side. This will take a little patience using a wrench or small socket as the space is very confined. Finally, you can remove the two lower bolts that hold the mount to the engine (See Figures 4 & 5).
Don’t worry if the bolt comes out with the nut as both will eventually have to come out.
Now the whole assemble is free from the car. Remove it by moving the coolant hoses apart and wrestling it out of its confines. You may find it easier to carefully lower the engine an inch or two to gain more space.
Once on your bench, you’ll see the mount is attached to the yoke by two long 15mm bolts. Remove them (See Figure 6).
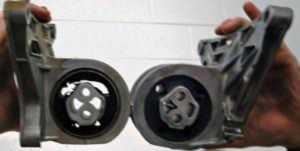
You’ll notice there is a rubber washer on each side of the engine mount. Note their orientation for reinstallation later. In Figure 7 you can see the original mount on your left compared to the new one on your right.
There was a significant amount of rubber that had been worn out on the top of the original one which led to my vibration.
Place the new mount into its yoke and reverse the process to reinstall it into the car. Be sure to tighten all the bolts to 34 ft-lb (46Nm) (See figure 8).
Take your car out for a drive and give yourself a pat on the back for a job well done! It took my son, Evan, and me less than two hours from start to finish and that included taking the pictures and making notes.

Fig. 1 
Fig 2 Fig. 3 Fig. 4 Fig 5 Fig. 6 Fig. 7 Fig. 8


